IPC机制系列八 Binder连接池

Binder连接池

       之前我们介绍了不同的IPC方式,在本节中要再次介绍一下AIDL,原因是AIDL是一种最常用的进程间通信方式,是日常开发中涉及进程间通信时的首选,所以我们需要额外强调一下。

       如何使用AIDL在上面的一节中已经进行了介绍,这里再回顾一下大致流程:首先创建一个Service和一个AIDL接口,接着创建一个类继承自AIDL接口中的Stub类并实现Stub中的抽象方法,在Service的onBind方法中返回这个类的对象,然后客户端就可以绑定服务端Service,建立连接后就可以访问远程服务端的方法了。

       上述过程就是典型的AIDL的使用流程。现在考虑一种情况:公司的项目越来越庞大了,现在有10个不同的业务模块都需要使用AIDL来进行进程间通信,那我们该怎么处理呢?也许你会说:“就按照AIDL的实现方式一个个来吧”,这是可以的,如果用这种方法,首先我们需要创建10个Service,这好像有点多,如果有100个地方需要用到AIDL呢,先创建100个Service?到这里我们应该明白问题所在了。随着AIDL数量的增加,我们不能无限制地增加Service,Service是四大组件之一,本身就是一种系统资源。而且太多的Service会使得我们的应用看起来很重量级,因为正在运行的Service可以在应用详情页看到,当我们的应用详情显示有10个服务正在运行时,这看起来并不是什么好事。针对上述问题,我们需要减少Service的数量,将所有的AIDL放在同个Service中去管理。

       在这种模式下,整个工作机制是这样的:每个业务模块创建自己的AIDL接口并实现此接口,这个时候不同业务模块之间是不能有耦合的,所有实现细节我们要单独开来,然后向服务端提供自己的唯一标识和其对应的Binder对象;对于服务端来说,只需要一个Service就可以了,服务端提供一个queryBinder接口,这个接口能够根据业务模块的特征来返回相应的Binder对象给它们,不同的业务模块拿到所需的Binder对象后就可以进行远程方法调用了。由此可见,Binder连接池的主要作用就是将每个业务模块的Binder请求统一转发到远程Service中去执行,从而避免了重复创建Service的过程,它的工作原理如图所示。
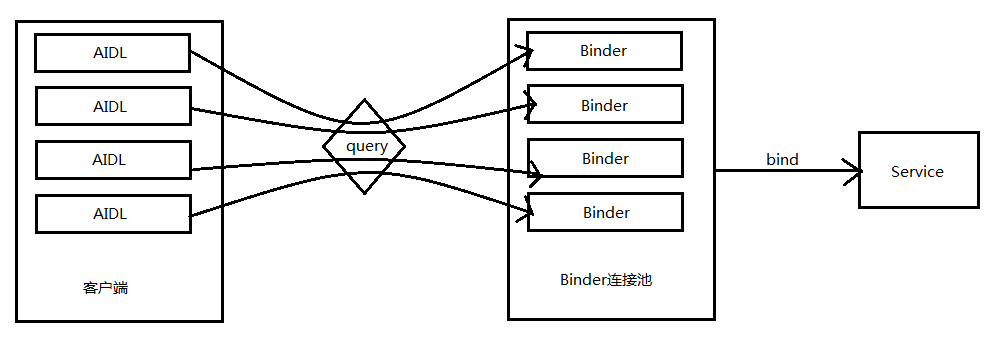
Binder连接池的工作原理

       下面对Binder连接池的代码实现做一下说明。首先,为了说明问题,我们提供了两个AIDL接口(ISecurityCenter和ICompute)来模拟上面提到的多个业务模块都要使用AIDL的情况,其中ISecurityCenter接口提供加解密功能,声明如下:

1
2
3
4
interface ISecurityCenter {
String encrypt(String content);
String decrypt(String password);
}

       而ICompute接口提供计算加法的功能,声明如下:

1
2
3
interface ICompute {
int add(int a,int b);
}

       接着看一下上面两个AIDL接口的实现,代码如下:

1
2
3
4
5
6
7
8
9
10
11
12
13
14
15
16
17
18
19
20
21
22
23
24
25
26
public class SecurityCenterImpl extends ISecurityCenter.Stub{

private static final char SECRET_CODE = '^';

@Override
public String encrypt(String content) throws RemoteException {
char [] chars = content.toCharArray();
for (int i = 0; i < chars.length; i++) {
chars[i] ^= SECRET_CODE;
}
return new String(chars);
}

@Override
public String decrypt(String password) throws RemoteException {
return encrypt(password);
}
}

public class ComputeImpl extends ICompute.Stub {

@Override
public int add(int a, int b) throws RemoteException {
return a + b;
}
}

       现在的业务模块的AIDL接口定义和实现都已经完成了,注意这里并没有为每个模块的AIDL单独创建Service,接下来就是服务端和Binder连接池的工作了。

       首先,为Binder连接池创建AIDL接口IBinderPool.aidl,代码如下:

1
2
3
4
5
6
7
interface IBinderPool {
/**
* @param binderCode, the unique token of specific Binder<br/>
* @return specific Binder who's token is binderCode.
*/
IBinder queryBinder(int binderCode);
}

       接着,为Binder连接池创建远程Service并实现IBinderPool,下面是queryBinder的具体实现,可以看到请求转发的实现方法,当Binder连接池连接上远程服务时,会根据不同模块的标识即binderCode返回不同的Binder对象,通过这个Binder对象所执行的操作全部发生在远程服务端。

1
2
3
4
5
6
7
8
9
10
11
12
13
14
15
@Override
public IBinder queryBinder(int binderCode) throws RemoteException {
IBinder binder = null;
switch (binderCode){
case BINDER_SECURUITY_CENTER:
binder = new SecurityCenterImpl();
break;
case BINDER_COMPUTE:
binder = new ComputeImpl();
break;
default:
break;
}
return binder;
}

       远程Service的实现比较简单,代码如下:

1
2
3
4
5
6
7
8
9
10
11
12
13
14
15
16
17
18
19
20
21
22
public class BinderPoolService extends Service{

private static final String TAG = "BinderPoolService";

private Binder mBinderPool = new BinderPool.BinderPoolImpl();

@Override
public void onCreate() {
super.onCreate();
}

@Override
public IBinder onBind(Intent intent) {
Log.d(TAG, "onBind");
return mBinderPool;
}

@Override
public void onDestroy() {
super.onDestroy();
}
}

       下面还剩下Binder连接池的具体实现,在它的内部首先它要去绑定远程服务,绑定成功后,客户端就可以通过它的queryBinder方法去获取各自对应的Binder,拿到所需的Binder以后,不同业务模块就可以进行各自的操作了,Binder连接池的代码如下所示:

1
2
3
4
5
6
7
8
9
10
11
12
13
14
15
16
17
18
19
20
21
22
23
24
25
26
27
28
29
30
31
32
33
34
35
36
37
38
39
40
41
42
43
44
45
46
47
48
49
50
51
52
53
54
55
56
57
58
59
60
61
62
63
64
65
66
67
68
69
70
71
72
73
74
75
76
77
78
79
80
81
82
83
84
85
86
87
88
89
90
91
92
93
94
95
96
97
98
99
100
101
102
103
104
105
106
107
108
public class BinderPool {

private static final String TAG = "BinderPool";
public static final int BINDER_NONE = -1;
public static final int BINDER_COMPUTE = 0;
public static final int BINDER_SECURUITY_CENTER = 1;

private Context mContext;
private IBinderPool mIBinderPool;
private static volatile BinderPool sInstance;
private CountDownLatch mConnectBinderPoolCopuntDownLacth;

private BinderPool(Context context) {
mContext = context.getApplicationContext();
connectBinderPoolService();
}

public static BinderPool getInstance(Context context) {
if (sInstance == null) {
synchronized (BinderPool.class) {
if (sInstance == null) {
sInstance = new BinderPool(context);
}
}
}
return sInstance;
}

private synchronized void connectBinderPoolService() {
mConnectBinderPoolCopuntDownLacth = new CountDownLatch(1);
Intent service = new Intent(mContext, BinderPoolService.class);
mContext.bindService(service, mBinderPoolConnection, Context.BIND_AUTO_CREATE);
try {
mConnectBinderPoolCopuntDownLacth.await();
} catch (InterruptedException e) {
e.printStackTrace();
}
}

/**
* query binder by binderCode from binder pool
*
* @param binderCode the unique token of binder
* @return binder who's token is binderCode<br>
* return null when not found or BinderPoolService died.
*/
public IBinder queryBinder(int binderCode) {
IBinder binder = null;
try {
if (mIBinderPool != null) {
binder = mIBinderPool.queryBinder(binderCode);
}
} catch (RemoteException e) {
e.printStackTrace();
}
return binder;
}

private ServiceConnection mBinderPoolConnection = new ServiceConnection() {

@Override
public void onServiceConnected(ComponentName name, IBinder service) {
mIBinderPool = IBinderPool.Stub.asInterface(service);
try {
mIBinderPool.asBinder().linkToDeath(mBinderPoolDeathRecipient,0);
} catch (RemoteException e) {
e.printStackTrace();
}
mConnectBinderPoolCopuntDownLacth.countDown();
}

@Override
public void onServiceDisconnected(ComponentName name) {
// ignored.
}
};

private IBinder.DeathRecipient mBinderPoolDeathRecipient = new IBinder.DeathRecipient() {
@Override
public void binderDied() {
Log.w(TAG, "binder died.");
mIBinderPool.asBinder().unlinkToDeath(mBinderPoolDeathRecipient,0);
mIBinderPool = null;
connectBinderPoolService();
}
};

public static class BinderPoolImpl extends IBinderPool.Stub{

public BinderPoolImpl(){
super();
}

@Override
public IBinder queryBinder(int binderCode) throws RemoteException {
IBinder binder = null;
switch (binderCode){
case BINDER_SECURUITY_CENTER:
binder = new SecurityCenterImpl();
break;
case BINDER_COMPUTE:
binder = new ComputeImpl();
break;
}
return binder;
}
}
}

       Binder连接池的具体实现就分析完了,它的好处是显而易见的,针对上面的例子,我们只需要创建一个Service即可完成多个AIDL接口的工作,下面我们来验证一下效果。新创建一个Activity,在线程中执行如下操作:

1
2
3
4
5
6
7
8
9
10
11
12
13
14
15
16
17
18
19
20
21
22
23
private void dowork() {
BinderPool binderPool = BinderPool.getInstance(BinderPoolActivity.this);
IBinder securityBinder = binderPool.queryBinder(BinderPool.BINDER_SECURUITY_CENTER);
mSecurityCenter = SecurityCenterImpl.asInterface(securityBinder);
Log.d(TAG, "visit ISecurityCenter");
String msg = "helloworld-安卓";
System.out.println("content:" + msg);
try {
String password = mSecurityCenter.encrypt(msg);
System.out.println("encrypt:" + password);
System.out.println("decrypt:" + mSecurityCenter.decrypt(password)); } catch (RemoteException e) {
e.printStackTrace();
}

Log.d(TAG, "visit ICompute");
IBinder computeBinder = binderpool.queryBinder(BinderPool.BINDER_COMPUTE);
mCompute = ComputeImpl.asInterface(computeBinder);
try {
System.out.print("3+5=" + mCompute.add(3,5));
} catch (RemoteException e) {
e.printStackTrace();
}
}

       在上述代码中,我们先后调用了ISecurityCenter和ICompute这两个AIDL接口中的方法,看一下log,很显然,工作正常。

1
2
3
4
5
6
D/BinderPoolActivity: visit ISecurityCenter
I/System.out: content:helloworld-安卓
I/System.out: encrypt:6;221)1,2:s寗匍
I/System.out: decrypt:helloworld-安卓
D/BinderPoolActivity: visit ICompute
I/System.out: 3+5=8

       这里需要额外说明一下,为什么要在线程中去执行呢?这是因为在Binder连接池的实现中,我们通过CountDownLatch将bindService这一异步操作转换成了同步操作,这就意味着它有可能是耗时的,然后就是Binder方法的调用过程也可能是耗时的,因此不建议放在主线程中执行。注意到BindePool是一个单例实现,因此在同一个进程中只会初始化一次,所以如果我们提前初始化BinderPool,那么可以优化程序的体验,比如我们可以放在Application中提前对BinderPool进行初始化,虽然这不能保证当我们调用BinderPool时它一定是初始化好的,但是在大多数情况下,这种初始化工作(绑定远程服务)的时间开销(如果BinderPool没有提前初始化完成的话)是可以接受的。另外,BinderPool中有断线重连的机制,当远程服务意外终止时,BinderPool会重新建立连接,这个时候如果业务模块中的Binder调用出现了异常,也需要手动去重新获取最新的Binder对象,这个是需要注意的。

       有了BinderPool可以大大方便日常的开发工作,比如如果有一个新的业务模块需要添加新的AIDL,那么在它实现了自己的AIDL接口后,只需要修改BinderPoolImpl中的queryBinder方法,给自己添加一个新的binderCode并返回对应的Binder对象即可,不需要做其它修改,也不需要创建新的Service。由此可见,BinderPool能够极大地提高AIDL的开发效率,并且可以避免大量的Service创建,因此,建议在AIDL开发工作中引入BinderPool机制。

参考资料:
《Android 开发艺术探索》任玉刚 第2章 2.5 Binder连接池

Fork me on GitHub