Glide入门教程(9)通知栏和桌面小控件的图片加载

加载图片到通知栏

notification-icon-cropped

       系统通知的图标为用户传递了重要的内容。用NotificationCompat.Builder为通知传递一个图片是最直接的方式,但是这个图片必须是Bitmap格式的。如果这个图片已经在手机上,那没问题。但如果这个图片还不在手机上,需要从网络下载,想要用这个标准的工具是不现实的。

       在前面学习了如何用SimpleTarget下载图片。理论上可以利用那个方法加载图片到你的系统通知中。但没必要那样,因为Glide通过一个方便的NotificationTarget提供了更舒服的方式。

Notification Target

       为了在系统通知里显示一个大图,你可以使用RemoteView,并显示一个定制的通知。
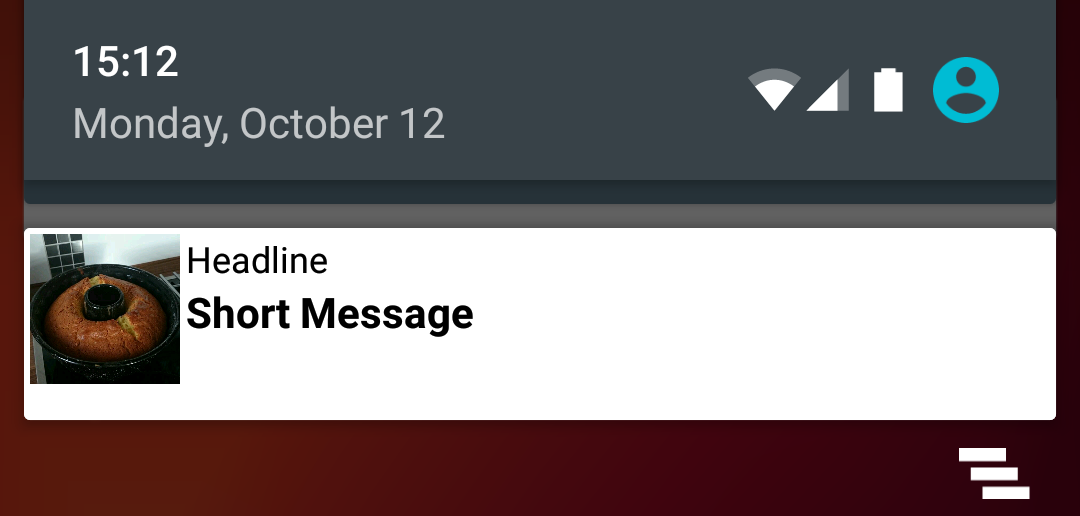
custom-notification

       我们自定义的通知布局非常简单:

1
2
3
4
5
6
7
8
9
10
11
12
13
14
15
16
17
18
19
20
21
22
23
24
25
26
27
28
29
30
31
32
33
34
35
36
37
38
39
40
41
42
43
44
45
46
47
48
49
50
<?xml version="1.0" encoding="utf-8"?>  
<LinearLayout
xmlns:android="http://schemas.android.com/apk/res/android"
android:layout_width="match_parent"
android:layout_height="wrap_content"
android:background="@android:color/white"
android:orientation="vertical">

<LinearLayout
android:layout_width="match_parent"
android:layout_height="wrap_content"
android:orientation="horizontal"
android:padding="2dp">

<ImageView
android:id="@+id/remoteview_notification_icon"
android:layout_width="50dp"
android:layout_height="50dp"
android:layout_marginRight="2dp"
android:layout_weight="0"
android:scaleType="centerCrop"/>

<LinearLayout
android:layout_width="0dp"
android:layout_height="wrap_content"
android:layout_weight="1"
android:orientation="vertical">

<TextView
android:id="@+id/remoteview_notification_headline"
android:layout_width="match_parent"
android:layout_height="wrap_content"
android:ellipsize="end"
android:singleLine="true"
android:textSize="12sp"/>

<TextView
android:id="@+id/remoteview_notification_short_message"
android:layout_width="match_parent"
android:layout_height="wrap_content"
android:ellipsize="end"
android:paddingBottom="2dp"
android:singleLine="true"
android:textSize="14sp"
android:textStyle="bold"/>

</LinearLayout>
</LinearLayout>

</LinearLayout>

       下面的代码用上面的布局文件创建了一个自定义的通知。

1
2
3
4
5
6
7
8
9
10
11
12
13
14
15
16
17
18
19
20
21
22
23
24
25
final RemoteViews rv = new RemoteViews(context.getPackageName(), R.layout.remoteview_notification);

rv.setImageViewResource(R.id.remoteview_notification_icon, R.mipmap.future_studio_launcher);

rv.setTextViewText(R.id.remoteview_notification_headline, "Headline");
rv.setTextViewText(R.id.remoteview_notification_short_message, "Short Message");

// build notification
NotificationCompat.Builder mBuilder =
new NotificationCompat.Builder(context)
.setSmallIcon(R.mipmap.future_studio_launcher)
.setContentTitle("Content Title")
.setContentText("Content Text")
.setContent(rv)
.setPriority( NotificationCompat.PRIORITY_MIN);

final Notification notification = mBuilder.build();

// set big content view for newer androids
if (android.os.Build.VERSION.SDK_INT >= 16) {
notification.bigContentView = rv;
}

NotificationManager mNotificationManager = (NotificationManager) context.getSystemService(Context.NOTIFICATION_SERVICE);
mNotificationManager.notify(NOTIFICATION_ID, notification);

       这段代码创建了三个重要的对象,Notification、RemoteView和常量NOTIFICATION_ID。我们需要这些去创建notification target:

1
2
3
4
5
6
7
8
9
10
private NotificationTarget notificationTarget;

...

notificationTarget = new NotificationTarget(
context,
rv,
R.id.remoteview_notification_icon,
notification,
NOTIFICATION_ID);

       最后,我们需要与以前一样调用Glide,将target作为.into()的参数传入:

1
2
3
4
5
Glide  
.with( context.getApplicationContext() ) // safer!
.load( eatFoodyImages[3] )
.asBitmap()
.into( notificationTarget );

       结果是只要图片被加载了,我们定制的通知栏就会显示。

应用小控件

       如果app的小控件包含图片,Glide的AppWidgetTarget可以帮助你实现起来更简单。看一个简单的AppWidgetProvider的例子:

1
2
3
4
5
6
7
8
9
10
11
12
13
14
15
16
17
18
19
20
21
22
23
24
25
26
public class FSAppWidgetProvider extends AppWidgetProvider {

private AppWidgetTarget appWidgetTarget;

@Override
public void onUpdate(Context context, AppWidgetManager appWidgetManager, int[] appWidgetIds) {

RemoteViews rv = new RemoteViews(context.getPackageName(), R.layout.custom_view_futurestudio);

appWidgetTarget = new AppWidgetTarget( context, rv, R.id.custom_view_image, appWidgetIds );

Glide
.with( context.getApplicationContext() ) // safer!
.load( GlideExampleActivity.eatFoodyImages[3] )
.asBitmap()
.into( appWidgetTarget );

pushWidgetUpdate(context, rv);
}

public static void pushWidgetUpdate(Context context, RemoteViews rv) {
ComponentName myWidget = new ComponentName(context, FSAppWidgetProvider.class);
AppWidgetManager manager = AppWidgetManager.getInstance(context);
manager.updateAppWidget(myWidget, rv);
}
}

       最重要的代码是AppWidgetTarget对象的声明和Glide的构造。不必覆写onResourceReady方法定制AppWidgetTarget。Glide为你自动处理了一切。

参考资料:
签到钱就到 Glide入门教程——11.通知栏和桌面小控件的图片加载

Fork me on GitHub