简述
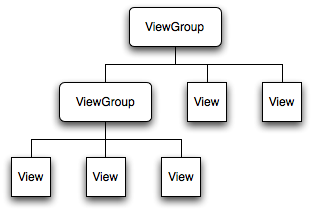
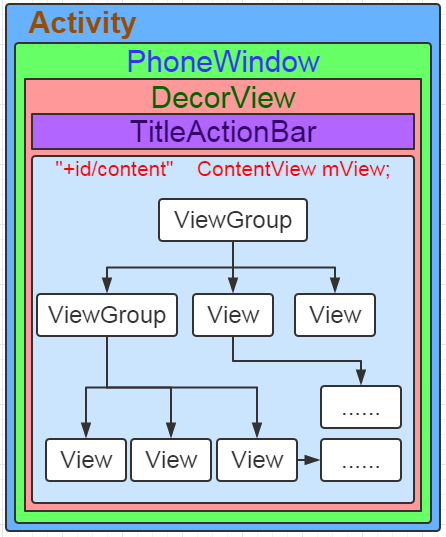
在一个Android应用程序中,用户界面通过View和ViewGroup对象构建。所有View的子类成为“Widget”,所有ViewGroup的子类成为“Layout”。View和ViewGroup之间采用了组合设计模式。ViewGroup作为布局容器类的最上层,布局容器里面又可以有View和ViewGroup。
ViewGroup和View的组合关系如下图:
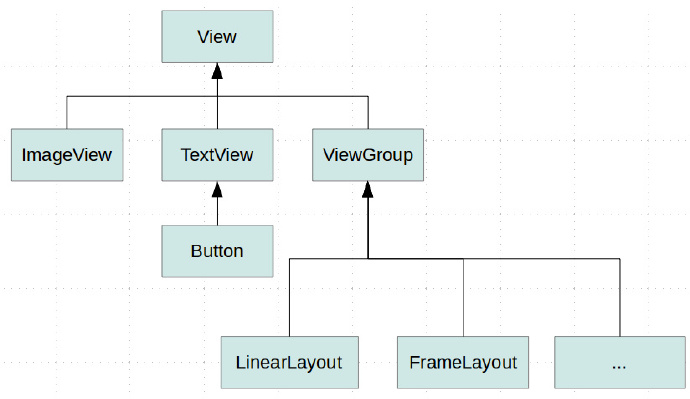
ViewGroup和View的继承关系如下图:
开发中,通常都是在onCreate()中调用setContentView(R.layout.custom_layout)来实现想要的页面布局,我们知道,页面都是依附在窗口之上的,而DecorView即是窗口最顶层的视图,这个布局是被放到了一个叫做DecorView的父布局里。Android frameworks中,与窗口视图处理相关的类,主要是Window及其实现类PhoneWindow,每一个Activity都有一个PhoneWindow对象。
1 | public class PhoneWindow extends Window implements MenuBuilder.Callback { |
DecorView其实是PhoneWindow中的一个内部类,本质上也是一个View,其只是扩展了FrameLayout的实现。
1 | private final class DecorView extends FrameLayout implements RootViewSurfaceTaker { |
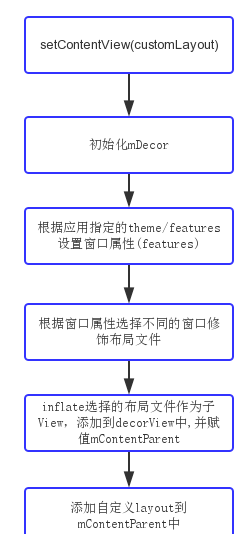
页面layout被添加至窗口Window的流程大致如下:
Activity的setContentView方法解析(Android5.1.1(API 22))
Activity的源码中提供了三个重载的setContentView方法,如下:
1 | public void setContentView(int layoutResID) { |
它们都先调运了getWindow()的setContentView方法,具体实现为PhoneWindow中的同名方法,getWindow()获取的即是PhoneWindow对象,然后调运Activity的initWindowDecorActionBar方法。
关于窗口Window类的一些关系
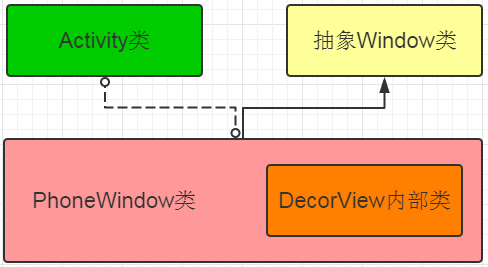
Activity中有一个成员为Window,其实例化对象为PhoneWindow,PhoneWindow为抽象Window类的实现类。
这里先简要说明下这些类的职责:
- Window是一个抽象类,提供了绘制窗口的一组通用API。
- PhoneWindow是Window的具体继承实现类。而且该类内部包含了一个DecorView对象,该DecorView对象是所有应用窗口(Activity界面)的根View。
- DecorView是PhoneWindow的内部类,是FrameLayout的子类,是对FrameLayout进行功能的修饰(所以叫DecorXXX),是所有应用窗口的根View 。
Window的一个比较重要的属性是mWindowManager,它是WindowManager(这是个接口)的一个实现类的一个实例。我们平时通过getWindowManager()方法获得的东西就是这个mWindowManager。顾名思义,它是Window的管理者,负责管理着窗口及其中显示的内容。它的实际实现类是WindowManagerImpl。mWindowManager并不是在PhoneWindow中实例化的,是在父类就实例化好的。
窗口PhoneWindow类的setContentView方法
可以看见Window类的setContentView方法都是抽象的。直接先看PhoneWindow类的setContentView(int layoutResID)方法源码,如下:
1 | public void setContentView(int layoutResID) { |
可以看见,第五行首先判断mContentParent是否为null,也就是第一次调运);如果是第一次调用,则调用installDecor()方法,否则判断是否设置FEATURE_CONTENT_TRANSITIONS Window属性(默认false),如果没有就移除该mContentParent内所有的所有子View;接着16行mLayoutInflater.inflate(layoutResID, mContentParent);将我们的资源文件通过LayoutInflater对象转换为View树,并且添加至mContentParent视图中(其中mLayoutInflater是在PhoneWindow的构造函数中得到实例对象的LayoutInflater.from(context);)。
再来看下PhoneWindow类的setContentView(View view)方法和setContentView(View view, ViewGroup.LayoutParams params)方法源码,如下:
1 |
|
其实只用分析setContentView(View view, ViewGroup.LayoutParams params)方法即可,如果你在Activity中调运setContentView(View view)方法,实质也是调运setContentView(View view, ViewGroup.LayoutParams params),只是LayoutParams设置成了MATCH_PARENT而已。
直接分析setContentView(View view, ViewGroup.LayoutParams params)方法,可以看见该方法与setContentView(int layoutResID)类似,只是少了LayoutInflater将xml文件解析转换为View而已,这里直接使用View的addView方法追加到了当前mContentParent。
窗口PhoneWindow类的installDecor方法
继续看上面PhoneWindow类setContentView方法的第6行installDecor();代码,在PhoneWindow中查看installDecor源码如下:
1 | private void installDecor() { |
第2到9行可以看出,首先判断mDecor对象是否为空,如果为空则调用generateDecor()创建一个DecorView(该类是FrameLayout子类,即一个ViewGroup视图),然后设置一些属性,我们看下PhoneWindow的generateDecor方法,如下:
1 | protected DecorView generateDecor() { |
可以看见generateDecor方法仅仅是new一个DecorView的实例。
回到installDecor方法继续往下看,第10行开始到方法结束都需要一个if (mContentParent == null)判断为真才会执行,当mContentParent对象为空则调用generateLayout()方法去创建mContentParent对象。看下generateLayout方法源码,如下:
1 | protected ViewGroup generateLayout(DecorView decor) { |
可以看见上面方法主要作用就是根据窗口的风格修饰类型为该窗口选择不同的窗口根布局文件。mDecor做为根视图将该窗口根布局添加进去,然后获取id为content的FrameLayout返回给mContentParent对象。所以installDecor方法实质就是产生mDecor和mContentParent对象。从上述步骤中,可以看出为什么在代码中必须要在setContentView(…)之前执行requestWindowFeature(…)。
我们平时写应用Activity时设置的theme或者feature(全屏、NoTitle等),一般是通过XML的android:theme属性或者java的requestFeature()方法来设置的,譬如:
通过java文件设置:
1 | requestWindowFeature(Window.FEATURE_NO_TITLE); |
通过xml文件设置:
1 | android:theme=“@android:style/Theme.NoTitleBar” |
其实requestWindowFeature()设置的值就是在这里通过getLocalFeature()获取的;而android:theme属性也是通过这里的getWindowStyle()获取的。
然后回过头可以看见上面PhoneWindow类的setContentView方法最后通过调运mLayoutInflater.inflate(layoutResID, mContentParent);或者mContentParent.addView(view, params);语句将我们的xml或者java View插入到了mContentParent(id为content的FrameLayout对象)ViewGroup中。最后setContentView还会调用一个Callback接口的成员函数onContentChanged来通知对应的Activity组件视图内容发生了变化。
Window类内部接口Callback的onContentChanged方法
上面说了PhoneWindow类的setContentView方法中最后调运了onContentChanged方法。我们这里看下setContentView这段代码,如下:
1 | public void setContentView(int layoutResID) { |
首先通过getCallback获取对象cb(回调接口),PhoneWindow没有重写Window的这个方法,所以到抽象类Window中可以看到:
1 | /** |
这个mCallback在哪赋值的呢,继续看Window类发现有一个方法,如下:
1 | public void setCallback(Callback callback) { |
Window中的mCallback是通过这个方法赋值的,那就回想一下,Window又是Activity的组合成员,那就是Activity一定调运这个方法了,回到Activity发现在Activity的attach方法中进行了设置,如下:
1 | final void attach(Context context, ActivityThread aThread, |
也就是说Activity类实现了Window的Callback接口。看下Activity实现的onContentChanged方法。如下:
1 | public void onContentChanged() { |
onContentChanged是个空方法。那就说明当Activity的布局改动时,即setContentView()或者addContentView()方法执行完毕时就会调用该方法。
所以当我们写App时,Activity的各种View的findViewById()方法等都可以放到该方法中,系统会帮忙回调。
setContentView源码分析总结
可以看出来setContentView整个过程主要是如何把Activity的布局文件或者java的View添加至窗口里,上面的过程可以重点概括为:
- 创建一个DecorView的对象mDecor,该mDecor对象将作为整个应用窗口的根视图。
- 依据Feature等style theme创建不同的窗口修饰布局文件,并且通过findViewById获取Activity布局文件该存放的地方(窗口修饰布局文件中id为content的FrameLayout)。
- 将Activity的布局文件添加至id为content的FrameLayout内。
至此整个setContentView的主要流程就分析完毕。 - 当setContentView设置显示OK以后会回调Activity的onContentChanged方法。Activity的各种View的findViewById()方法等都可以放到该方法中,系统会帮忙回调。
setContentView完以后Activity显示界面初探
这一小部分已经不属于sentContentView的分析范畴了,只是简单说明setContentView之后怎么被显示出来的。
一个Activity的开始实际是ActivityThread的main方法,当启动Activity调运完ActivityThread的main方法之后,接着调用ActivityThread类performLaunchActivity来创建要启动的Activity组件,在创建Activity组件的过程中,还会为该Activity组件创建窗口对象和视图对象;接着Activity组件创建完成之后,通过调用ActivityThread类的handleResumeActivity将它激活。
所以我们先看下handleResumeActivity方法,如下:
1 | final void handleResumeActivity(IBinder token, |
看r.activity.makeVisible();语句,调用Activity的makeVisible方法显示我们上面通过setContentView创建的mDecor视图族。所以我们看下Activity的makeVisible方法,如下:
1 | void makeVisible() { |
通过DecorView(FrameLayout,也即View)的setVisibility方法将View设置为VISIBLE,至此显示出来。到此setContentView的完整流程分析完毕。
如下就是整个Activity的分析简单关系图:
一些补充
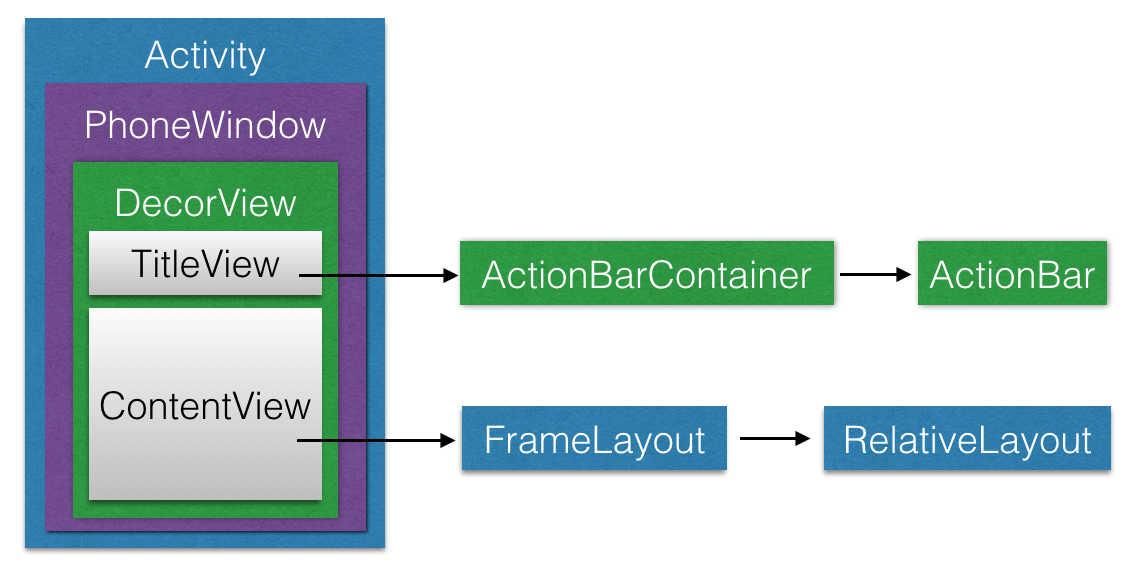
Activity、PhoneWiondow、DecorView的关系也可以表示为如下图:
- Window
位于 /frameworks/base/core/java/android/view/Window.java。该类是一个抽象类,提供了绘制窗口的一组通用API。可以将之理解为一个载体,各种View在这个载体上显示。
- PhoneWindow
位于
/frameworks/policies/base/phone/com/android/internal/policy/impl/PhoneWindow.java。该类继承于Window类,是Window类的具体实现,即我们可以通过该类具体去绘制窗口。并且,该类内部包含了一个DecorView对象,该DectorView对象是所有应用窗口(Activity界面)的根View。 简而言之,PhoneWindow类是把一个FrameLayout类即DecorView对象进行一定的包装,将它作为应用窗口的根View,并提供一组通用的窗口操作接口。
- WindowManager
WindowManager在Window中具有很重要的作用,在PhoneWindow中的mWindowManager实际是WindowManagerImpl类型的。WindowManagerImpl是接口WindowManager的一个实现类。WindowManager是在Activity执行attach()时被创建的,attach()方法是在onCreate()之前被调用的。
- DecorView
该类是PhoneWindow类的内部类。该类是一个FrameLayout的子类,并且是PhoneWindow的子类,该类就是对普通的FrameLayout进行功能的扩展,更确切点可以说是修饰(Decor的英文全称是Decoration,即“修饰”的意思),比如说添加TitleBar(标题栏),以及TitleBar上的滚动条等 。最重要的一点是,它是所有应用窗口的根View。通过setContentView()设置的布局是被放到DecorView中,DecorView是视图树的最顶层。
注意:
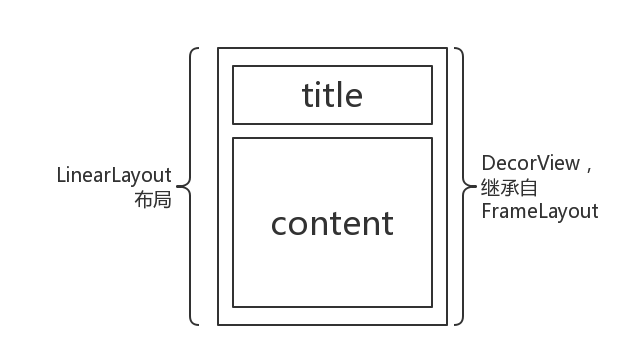
DecorView包含标题栏和内容区域两部分,它是继承自FrameLayout的,但这并不是说它自己的根布局是FrameLayout,事实上它的根布局是LinearLayout的。因为在generateLayout()方法中会选择不同的窗口修饰布局文件,而这些布局文件是LinearLayout布局。而内容区域的根布局才是FrameLayout布局。
如下图所示:

Window.FEATURE_NO_TITLE对应的窗口修饰布局文件为screen_simple.xml, 源码如下:
1 | <LinearLayout xmlns:android="http://schemas.android.com/apk/res/android" |
源码中id为”@android:id/content”的FrameLayout就是内容区域,在整个流程中,其会赋值给PhoneWindow类中的属性mContentParent。
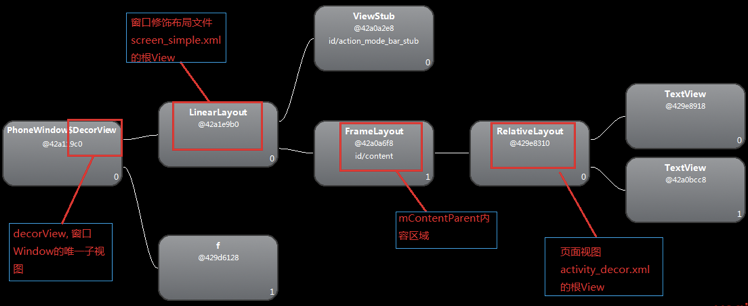
如下图:
运行应用后,使用SDK提供的hierarchyviewer工具查看页面的ViewTree结构,可以看到结构如下:
参考资料:
屌丝迷途 Android界面架构(Activity,PhoneWiondow,DecorView)简介
抹月 Window窗口布局 — DecorView浅析
工匠若水 Android应用setContentView与LayoutInflater加载解析机制源码分析
CoorChice 用两张图告诉你,为什么你的App会卡顿?
